Getting started with Next.js 15 and MDX
PreRamble
Jump to the articleI am very excited to start this blog. I've been thinking about doing so for a while now. I am interested in a lot of things and am always learning something new. This gives me ideas I want to share, and writing often helps me think through more complex ideas and problems. This will be an adventure into web technology, electronics, crafting, home & gardening, and who knows where else. Thanks for coming along!
Introduction
What better way to kick off a blog than to write about setting it up? I wanted to start off with something relatively simple to get going. I already work with markdown a lot, including writing documentation and taking notes most days with Obsidian. When I saw how easy it is to integrate markdown into a Next.js site I had to try it out. Committing assets like images to my git repo is not particularly optimal, and I will likely move assets to some CMS or cloud storage, even if I continue to use MDX for writing the blog content.
It took me some time to determine what libraries in the MDX ecosystem I wanted to start using and share here. I wanted to be sure everything is compatible and up to date with server-side rendering (SSR). For example, I found next-mdx-remote to not be well maintained as of 2025, and while its predecessor next-mdx-remote-client is better maintained, I ultimately concluded that both of them are overkill when loading markdown files from the local file system and using SSR. With @next/mdx, you can import markdown directly into a component, and using server-side components means the whole MDX javascript runtime should not need to be shipped to the client.
So, what we are going to work on here is the most streamlined way I have found to go from zero to writing a blog using MDX.
The code for this example is available on my GitHub.
Installation
We are going to follow the basic installation provided by Next.js, and follow up with some easy tweaks to get things started.
Create a new Next.js project
Open up your terminal and navigate to the folder where you want to create your new project. Run the following:
npx create-next-app@latestTo follow along with me, follow the prompts and choose the default values for everything. You may choose whatever is best for you, but we will be working with Typescript, Tailwind CSS, and Next.js' App Router. The App Router is the latest API, and we will be focused on using it effectively for server-side rendering.
Once the project is created, you can start the dev server and navigate to http://localhost:3000
npm run devIf you want to use pnpm instead of npm, then you can add --use-pnpm to
the end of the command. I have been enjoying pnpm, but will stick to npm
here to keep things straight forward.
Install Prettier (Optional)
Totally optional, so feel free to skip to the next section.
I like to set up Prettier for formatting early on in a project to keep things consistent and avoid big formatting commits later. I particularly like the Tailwind plugin, which will even consistently sort your HTML classes.
Add dev dependencies
Navigate your terminal to the project folder and install the required dev dependencies:
npm install --save-dev prettier prettier-plugin-tailwindcss eslint-plugin-prettierConfigure Prettier
Add a new file in your project root called .prettierrc.json and add your preferred configuration. Here's mine:
{
  "plugins": ["prettier-plugin-tailwindcss"],
  "singleQuote": true,
  "jsxSingleQuote": true,
  "semi": false
}
You can also add a script to your package.json to format the whole project at once.
{
  "scripts": {
    "format": "prettier --write ."
  }
}
Run the script and see it go to work!
npm run formatConfigure ESLint for Prettier
Extending the prettier rules will require affected files to be formatted for linting to succeed.
Update your eslint.config.mjs file to include the following
// ...
const eslintConfig = [
  ...compat.extends(
    'next/core-web-vitals',
    'next/typescript',
    'plugin:prettier/recommended', // <---
  ),
]
// ...
Execute ESLint to make sure everything is still working.
npm run lintInstalling MDX
Okay, now that we have the basic project bootstrapped, let's get to work on installing MDX.
Next documentation has some excellent details for getting started. We are going to follow that because we will not be using additional libraries to process .mdx files. We will be importing them directly from the file system into our components.
If you are loading markdown content from an external source, then you might
consider something like next-mdx-remote-client
. In that case, you
will not need to configure Next to import .mdx files directly.
Install dependencies
npm install @next/mdx @mdx-js/loader @mdx-js/react @types/mdxConfigure Next.json
Update the next.config.ts file to enable importing markdown files into your JSX components.
import { NextConfig } from 'next'
import createMDX from '@next/mdx'

const nextConfig: NextConfig = {
  // Configure `pageExtensions` to include markdown and MDX files
  pageExtensions: ['js', 'jsx', 'mdx', 'ts', 'tsx'],
}

const withMDX = createMDX({
  extension: /\.mdx?$/,
})

// Merge MDX config with Next.js config
export default withMDX(nextConfig)
Configure global MDX components
In the root of your project, add a file named mdx-components.tsx. This file is the place to inject global components available to use in any MDX files.
import type { MDXComponents } from 'mdx/types'

export function useMDXComponents(components: MDXComponents): MDXComponents {
  return { ...components }
}
Adding Markdown content
We're getting closer. We are going to be using dynamic imports to get markdown from the file system, similar to Next documentation, here. First, let's add some markdown files to our project.
Create some MDX files for our posts
Create a folder under src called blogs and add some MDX files with the .mdx file extension. You can name them whatever you like, but will use the filename as the URL slug, so I recommend using a lower-kabob-case convention.
Here are two examples: one to quickly get a feel for how the page will be styled with various markdown elements, and another simple one to demonstrate multiple pages.
export const metadata = {
  title: 'A test post',
  description: 'A post to test various markdown formatting',
  date: '2025-03-17T12:00:00Z',
  tags: ['Next.js', 'MDX', 'Typescript'],
}

## Heading 2

### Heading 3

#### Heading 4

A paragraph with some _emphasized_, **bolded**, and <s>strikethrough</s> text.

Unordered lists

- first
  - second
- third

Ordered lists

1. first
   1. second
2. third

> A quote!

[link to google](https://google.com)export const metadata = {
title: 'Another test post',
description: 'Demonstrating multiple posts',
date: '2025-03-18T12:00:00Z',
tags: ['writing'],
}
## Introduction
Hello!As you can see, we've also exported and object called metadata from the file. We will be able to use this, or any data exported from the MDX files, in our React code.
Routing to our pages
Now let's create a page in our App Router to view our MDX content! Under the src/app folder, create a new folder called blogs and under that a new folder called [slug]. There we will create our page.tsx file.
Here is a very basic page component. I've included a title section that uses the metadata we exported and the markdown content itself.
type BlogPageProps = {
  params: Promise<{ slug: string }>
}

type BlogPostMetadata = {
  title: string
  description: string
  date: string
  tags: string[]
}

export default async function BlogPage({ params }: BlogPageProps) {
  const { slug } = await params
  const post = await import(`@/blogs/${slug}.mdx`)

  // Get the react component from processing the MDX file
  const MDXContent = post.default

  // Process exported metadata to construct the title area of our blog post
  const metadata: BlogPostMetadata = post.metadata
  const title = metadata.title
  const date = new Date(metadata.date)
  const tags = metadata.tags
  const formattedDate = new Intl.DateTimeFormat('en-US', {
    month: 'short',
    day: 'numeric',
    year: 'numeric',
  }).format(date)

  return (
    <div className='flex flex-col items-center gap-6 py-6'>
      {/* some wrappers for styling and additional content*/}
      <div className='mx-auto w-full max-w-[768px]'>
        <article className='w-full p-6'>
          {/* A title section using the markdown metadata */}
          <div className='mt-6 mb-8'>
            <h1 className='mb-2 text-4xl font-bold'>{title}</h1>
            <div className='flex items-center gap-2 py-2'>
              <span className='text-sm'>{formattedDate}</span>|
              <div className='flex gap-1'>
                {tags.map((tag) => (
                  <span
                    key={tag}
                    className='border-foreground rounded-full border px-2 py-1 text-xs'
                  >
                    {tag}
                  </span>
                ))}
              </div>
            </div>
          </div>
          {/* The markdown content */}
          <MDXContent />
        </article>
      </div>
    </div>
  )
}

export function generateStaticParams() {
  // A list of params, which we will update shortly to use the file system.
  return [{ slug: 'markdown-test' }, { slug: 'another-post' }]
}

// By marking as false, accessing a route not defined in generateStaticParams will 404.
export const dynamicParams = false
Your project structure should now look like this:
project-root/
├── src/
│   ├── app/
│   │   ├── blogs/
│   │   │   └── [slug]/
│   │   │       └── page.tsx
│   │   ├── globals.css
│   │   ├── layout.tsx
│   │   └── page.tsx
│   └── blogs/
│       ├── markdown-test.mdx
│       └── another-post.mdx
├── mdx-components.tsx
├── ...
Test out what we have so far
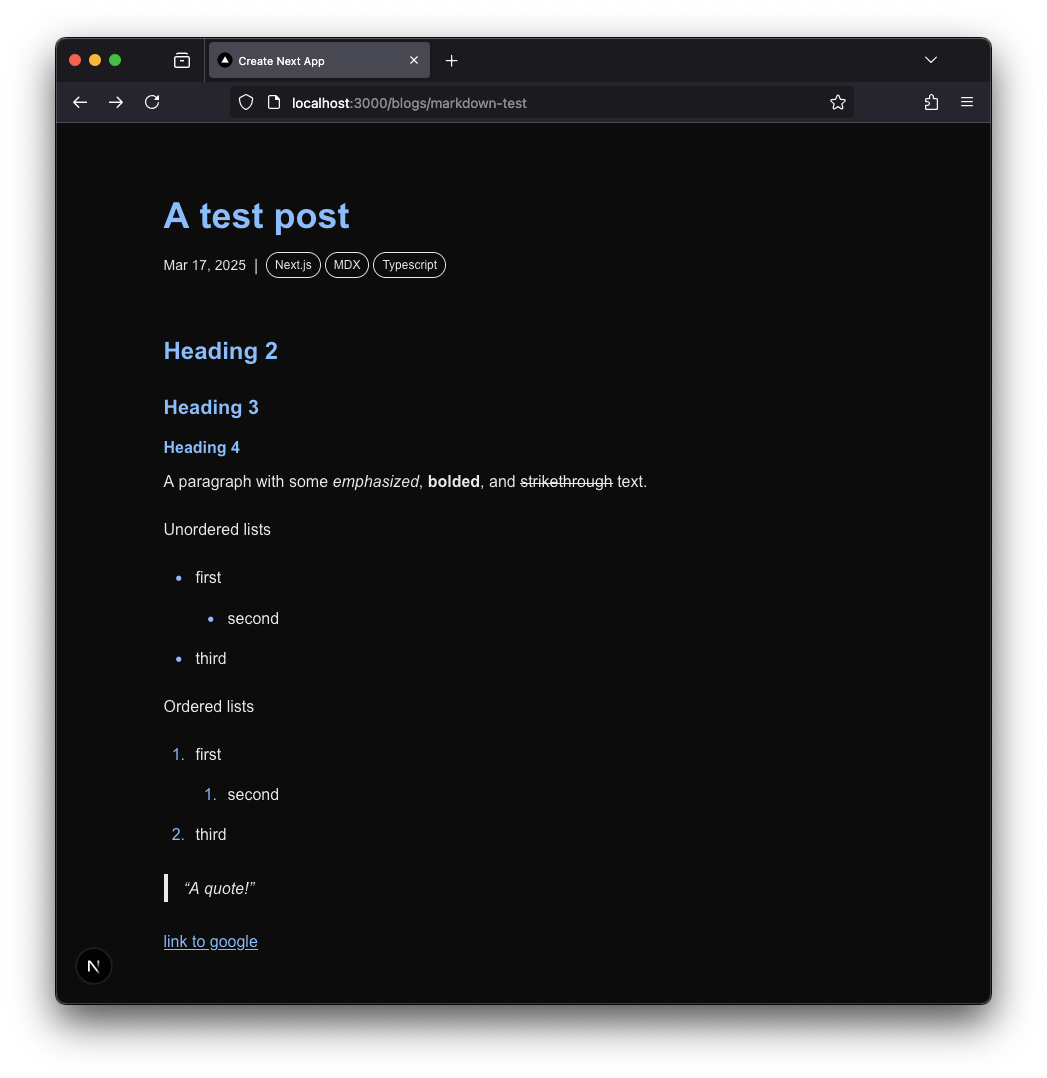
Navigate to http://localhost:3000/blogs/markdown-test in your browser to see where we are. You should see something like this:

Add styling
We can see that the base CSS from Tailwind doesn't add any formatting to the items generated from the markdown. We can remedy that quickly using the @tailwindcss/typography plugin.
Install the Tailwind Typography plugin
Add the necessary dev dependency.
npm install --save-dev @tailwindcss/typographyAnd import the new styles to the top of globals.css.
@import 'tailwindcss';
@plugin "@tailwindcss/typography";

/* ... */
Apply the formatting to our article content
The Typography plugin provides styling for everything under a tag with the prose class. So let's go ahead and add that to our <article>
<article className='prose w-full p-6'>Adjusting the Typography theme
The plugin provides a number of variables to work with. They won't fit well with the default theme we have (It's more pronounced with dark mode), though. For the sake of brevity, let's add some simple overrides. Feel free to tweak these values to incorporate them into your own theme!
:root {
  /* ...
   * add an accent color for light-mode */
  --primary: var(--color-blue-800);
}

@theme inline {
  /* ...
    * register additional colors to use with Tailwind classes, e.g. `bg-primary` */
  --color-primary: var(--primary);
}

@media (prefers-color-scheme: dark) {
  :root {
    /* ...
     * add an accent color for dark-mode */
    --primary: var(--color-blue-300);
  }
}

/* Overrides for Tailwind Typography */
article.prose {
  --tw-prose-body: var(--foreground);
  --tw-prose-headings: var(--primary);
  --tw-prose-lead: var(--foreground);
  --tw-prose-links: var(--primary);
  --tw-prose-bold: var(--foreground);
  --tw-prose-counters: var(--primary);
  --tw-prose-bullets: var(--primary);
  --tw-prose-hr: var(--foreground);
  --tw-prose-quotes: var(--foreground);
  --tw-prose-quote-borders: var(--foreground);
  --tw-prose-captions: var(--foreground);
  --tw-prose-kbd: var(--foreground);
  --tw-prose-code: var(--foreground);
  --tw-prose-pre-code: var(--foreground);
  --tw-prose-th-borders: var(--foreground);
  --tw-prose-td-borders: var(--foreground);
}
Now you should see something more like this:
Handling files and metadata
Let's add some utility functions to a module under src/lib. These will help us fetch the blog posts and their metadata.
Getting a single blog post with metadata
Let's move our BlogPostMetadata type to our new file and create a function new getBlogPost() function to use in page.tsx.
import type { Metadata } from 'next/types'

export type BlogPostMetadata = Metadata & {
  title: string
  description: string
  date: Date
  tags: string[]
}

export type BlogPostData = {
  slug: string
  metadata: BlogPostMetadata
  component: React.FC
}

export const getBlogPost = async (slug: string): Promise<BlogPostData> => {
  const post = await import(`@/blogs/${slug}.mdx`)
  const data = post.metadata

  if (!data.title || !data.description) {
    throw new Error(`Missing some required metadata fields in: ${slug}`)
  }

  const metadata: BlogPostMetadata = {
    ...data,
    date: new Date(data.date),
    updatedDate: data.updatedDate ? new Date(data.updatedDate) : undefined,
  }

  return {
    slug,
    metadata,
    component: post.default,
  }
}
Now, we can use it in page.tsx.
type BlogPostMetadata = {
  title: string
  descriptions: string
  date: string
  tags: string[]
}

export default async function BlogPage({ params }: BlogPageProps) {
  const { slug } = await params
  const post = await import(`@/blogs/${slug}.mdx`)

  const MDXContent = post.default
  const metadata: BlogPostMetadata = post.metadata
  const { metadata, component: MDXContent } = await getBlogPost(slug)
Generate metadata for each page
We can also use the getBlogPost() function to help generate metadata.
Additional details for dynamic metadata can be found in Next.js documentation.
import { Metadata } from 'next/types'

/* ... */

export async function generateMetadata({
  params,
}: BlogPageProps): Promise<Metadata> {
  const { slug } = await params
  const { metadata } = await getBlogPost(slug)

  return {
    title: metadata.title,
    description: metadata.description,
    keywords: metadata.tags,
    // other...
  }
}
Generating params for each page
So far we have only hard-coded params for our two pages. Let's update our page.tsx to scan the whole src/blogs/ directory and build the appropriate params for our pages.
First, we can add a helper function to enumerate all of the blog posts.
import fs from 'node:fs/promises'
import path from 'node:path'

/* ... */

export const listBlogPosts = async (): Promise<
  Omit<BlogPostData, 'component'>[]
> => {
  const files = await fs.readdir(path.join(process.cwd(), 'src/blogs'))

  return Promise.all(
    files.map(async (file) => {
      const slug = file.replace(/\.mdx$/, '')
      const { metadata } = await getBlogPost(slug)
      return {
        slug,
        metadata,
      }
    }),
  )
}
Then, we can update the static params we generate.
export async function generateStaticParams() {
  const blogPosts = await listBlogPosts()
  const blogStaticParams = blogPosts.map((post) => ({
    slug: post.slug,
  }))

  return blogStaticParams
}
Wrap up
Now we are all set to write any number of blog posts with new files in the src/blogs/ folder!
We've covered:
- Creating a new project with Next.js, Typescript, and Tailwind CSS,
- Installing MDX for Next.js
- Dynamic routing for pages with MDX content and properly exporting page metadata
- Styling with the Tailwind Typography plugin
To continue your journey using MDX, you should definitley check out the following additional resources:
Cheers!